
In 2004, I needed a new computer. My 1999 Dell just was outdated enough that the time had come. However, I was frustrated with the selection of off-the-shelf models lots of bells and whistles, but not in the areas I wanted them, and not at the price I wanted to pay. So in my generally cantankerous spirit, I said to hell with them, and decided to build my own.
This determination was wholly unabated by my complete lack of knowledge and skill necessary for the task.[1]
But I managed to do ok with my first "build". I spent far less on it than my wife did on her new computer, and had a better result in many respects. Spurred on by my 2004 success, I decided to upgrade my computer this year, after putting it off longer than I should based on my theory regarding a sensible upgrade schedule.
Tab A, Slot B, repeat as needed.
Building a computer form components is a lot easier than it sounds. If you can play with Legos successfully, you can build a computer these days. These are not the days of room size computers and Alan Turing saving the world with hand-made computer science[2].
Computer components are all essentially made to plug into each other, no soldering, no electronic assembly experience necessary. Tab A, Slot B, repeat. And there's really not THAT much inside your standard computer case. All you really need to know is what components make up a computer, which are best to suit your needs, where to get them cheap, and how best to slap them together.
For that, the internet makes specialized knowledge obsolete. There are a myriad of sites catering to the computer building “enthusiast”, and no lack of information to go on[3]. The best thing about this approach is that you can choose the right mix of components for what you need, rather than the one-size fits all of off-the-shelf brands, and you’ll have familiarized yourself with good resources for FREE tech support when and if something goes wrong down the line.
To demonstrate how easy the process is even for the technologically impaired[4] I am going to walk us through my new build, step by step.
The Build: 2010
Step 1: Buy Stuff.
As stated previously, Slickdeals is a great site for finding deals on pretty much anything. For the people, by the people kind of place. Literally every new component I bought was on a crazy sale/discount deal that was posted here. This saved a lot of cash[5]. The components are labeled here for reference.
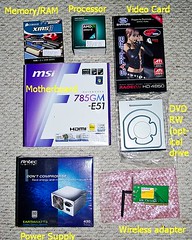
I had several parts of my old computer that were still serviceable for the new model. These included my case, case fans, 1 optical drive (dvdrw), and hard drive. However, for all intents and purposes[6] , I was gutting the old system.
Step 2: Gut the Old System.
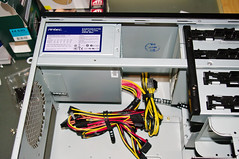
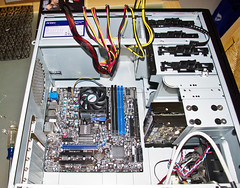
I started by opening up my computer. This is what a computer looks like inside.
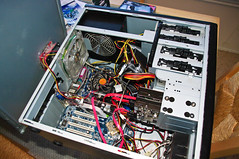
If you have not opened yours before, yours will look vaguely like this, but covered in a blanket of dust. You will notice that I did not take much care in how wires were run, and the overall impression is of a psychedelic technocrat’s nest[7]
I started by stripping out the power supply and related cables, to get my work area free of noodly appendages. 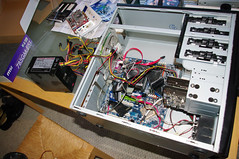
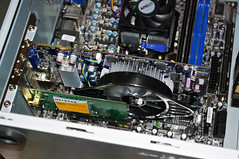
I then removed the motherboard and the rest of the components except for the two hard drives (bottom right) which were staying for the new build. 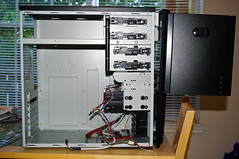
Finally, the almost empty shell got a nice cleaning. Did you know some small spiders can nest in computers? Imagine our mutual surprise. Undaunted, we were ready to prep our new components for insertion.
Step 3: Install the Power Supply.
Here we will make our first introductions with the computer components. Be confidant, they can smell fear.
The power supply is exactly what it sounds like. It’s transforms the current from the wall into the voltages that your compenets need[8]. It went in first on my build because it’s hard to get it into place when everything else is in the box.
Step 4: Pre-assemble the Motherboard/Processor/RAM.
The next step is fairly simple, but also involves the most care on your part. The real guts of the computer is the combination of motherboard/processor/and memory.
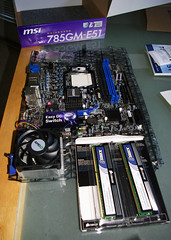
Since these will all be screwed into the case as a single unit, it was easier to put them all together outside, and then place the whole unit in.
The motherboard is the nervous system of the computer. It links all the components together and is the highway on which data travels between them. The processor is the brain of the computer, it performs the data calculations that are the actual “computing”. The memory is essentially the holding place for data the brain/processor is working on[9].
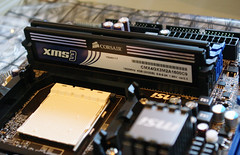
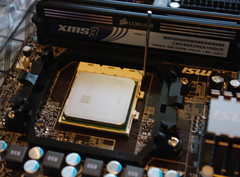
So first the memory gets inserted(picture 1), then the processor (picture 2), then the processor cooling fan (picture 3)[10].
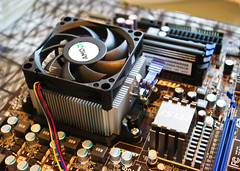
The end result is a motherboard ready to be placed into the case. Again, no electronics know-how needed. Everything snaps into pre-determined slots, no tools necessary[11].
Step 5: Install the motherboard.
This is fairly self explanatory. It rests on a series of screws that attach it to the case, and space it a small distance away from the case wall.
(The colored wires you see are the leads from the power supply, for now they are drape out of the way.)
Step 6: Install any PCI-E/PCI cards.
If one was building a basic computer, this step may be irrelevant. Your motherboard has expansion slots to add cards. Different cards enable different upgrades. For most users, there is no need to add an additional video card. This is primarily a gaming aid. Your motherboard has a video processor built in, though it is not up to the task of hardcore 3d gaming performance. I chose to add a modest[12] Radeon 4850 card to my system. I also added a wireless adapter to connect to our home’s wireless network.
Step 7: Wire it up!
After adding in a few case fans to help with heat dissipation (and also because they glow a purty red color when they’re turned on), it was time for the least fun aspect of the build: connecting all the various cables and power leads. Again, this does not neede electrical knowhow, it’s like plugging any power cord into anything. There’s just a lot of them. Each component usually has a power cord, and most have a data cable. With all these cords, it can get messy fast. Therefore I waited until everything was in place, so I could figure out where to run each wire, in conjunction with what was around it. The end result was a (relatively) neat and tidy case. During this phase I also installed the optical drives (top right) which are the fancy names for the cd or dvd drives for the computer. I have two, though I probably only need one. Like the other components these plug into the motherboard.

Step 8: Software!
With the hardware in place, I closed up the computer and got ready to tackle the software issue. If this had been a from-scratch build, like my last, I would have had to install the operating system (windows). However, I was not replacing my hard drives (where the information on your computer “lives”). I did have to update the software with Microsoft, and find new drivers for my new components. A driver is simply a small piece of data that explains to your operating system how to interact with a specific component, like a user’s manual. Windows takes care of this automatically for many components, but some need to be updated. For the most part, this is handled by popping in a cd that comes with the component, and Windows handles the rest. Even Vista, for all its faults, makes this a fairly simple process. If one did not already have software, then this is a great time for you. Almost anything you need can be had for free. Legally. Open source software hasd a version for pretty much any program you can think of. Open Office virtually duplicates MS Office, and saves in MS Office format. Photoshop, windows media player, etc etc etc. They all have excellent free versions available. Cnet Download is a great place to get some free programs, as rated by users to help find the best.

There we go. It sounds more complicated than it really is. All one really needs to know is what the primary components are, and what they need. The rest is fairly idiot proof. It is inherently geeky, but it's oddly satisfying. If for no other reason, I recommend a self-build as a great way to get to know about your computer. It's not that complicated. There are only a few key components, and they have fairly easy-to-understand roles. The benefit of this is that when something goes wrong, you're far less likely to have to pay someone to fix it for you, and more likely to be able to do it yourself. Add in some cost savings, and the ability to get what you really want, and
[1] In general it can be said I'm seldom deterred by lack of experience, skill, knowledge, common sense, or rational self interest. I'm sure my wife and neighbors within blast radius would concur.
[2] ..and then being prosecuted and chemically castrated for his efforts, because what was really important was that he was gay, not that he had saved the free world through his efforts on encryption, or that he had almost single-handedly ushered in the modern computer age. No, no, the fact that he preferred men was MUCH more important. Thanks, 50’s America, you kept the spirit of Salem alive and well. Thankfully, it is a much kinder, gentler hobby these days.
[3] The best sources for the enterprising young geek are arguably: Tom’s Hardware for basic knowledge and product ratings, Ars Technica for a forum of people who gladly dole out sage advice on all things technological, Newegg for cheap parts and good service, and Slickdeals to help find great deals on all the components you will need.
[4] This is, of course, self referential. I still can’t set the VCR clock. I just have made peace with it by rationalizing that the time it shows reflects an alternate dimension slightly removed from our own, therefore rendering any attempt to reset it a tentatively dangerous proposition as it may somehow breach the dimensional walls, and lead to a cataclysmic explosion. Creativity helps with technological incompetence.
[5] In general, whether to build a system (assuming you’re not doing it just for the hell of it) depends on your price range. Want to spend less than $300 and you’re not a PC gamer? Buy something off the shelf. It doesn’t have to be top of the line, the lowest end will still outperform what you need it for. Also, because these come with an operating system (Windows, etc) bundled, it’s hard to beat the price. However, for most mid-range users, a self-build is a very attractive option, especially as retail operating system licenses are transferrable to new computers, UNLIKE the “OEM” license that comes with your store-bought computer.
[6] I cannot write that without thinking of the best mondegreen ever, being a friend’s unintended substitution of “all intensive porpoises” in its place. Even better than the usual bastardization as “all intensive purposes”.
[7] There is a segment of builders who take almost perverse pride in having a clean appearance inside their case. They go so far as to invoke a technological feng shui-esque, “Cable Fu”. Honestly, I couldn’t make this stuff up if I tried.
[8] The great thing is that other than having a general idea how big a supply you need (usually in the 450-500 watt range), you really don’t need to know the electronics of it. Your involvement will be limited to a) buying, and b) screwing in, the PSU.
[9] This is not the same thing as storage space. This is short term memory, not the long term storage capacity on your hard drive. So if you have a million mp3s and are running out of room, you need more storage space, not more “memory”.
[10] While doing this it is best to grab something metal, or tie yourself to a ground, to prevent any stray static discharge from affecting these delicate components.
[11] Hardcore users often will apply a layer of heat transferring thermal past between the processor and its cooling fan, to aid in heat dissipation. I am not hardcore enough to warrant this.
[12] Video cards are cost drivers for computers. Newest models are several hundred dollars to $1000 plus. However there is a steep price decline as new tech emerges, which it does frighteningly fast. I spent about $70 for my card, which would normally go for about $100, retail. It will be more than I need, but will allow me to indulge in a 3d game now and then. This is not necessary for most windowed or flash games as one might get on facebook. If you bought the game in a box at a store, you most likely will need a video card.
2 comments:
My computer has buttons. A lot of buttons.
You need to press them. All of them. Only way to know if they work. preferrably simultaneously.
Post a Comment